NOTICE: This post references card features that have changed, expired, or are not currently available
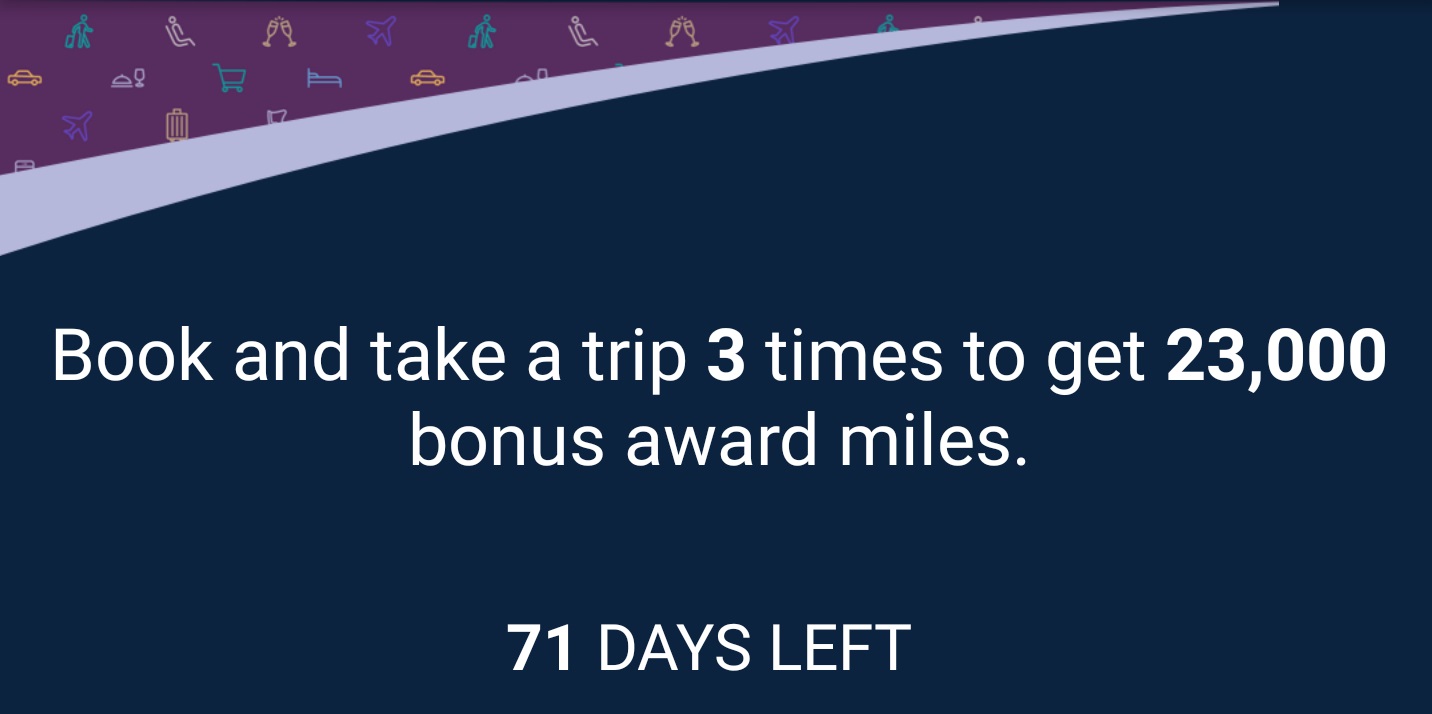
Mile Play is a United promotion that periodically targets United MileagePlus members to earn extra miles for completing different bonus criteria. These offers usually come via email and show up in the United app. For the most recent promo period, which ends 10/31/19, I had a really generous offer: book 3 trips of at least $250 and earn 23,000 bonus miles. That’s abnormally high and a really good value for anyone who had a few paid flights to book. The problem? I didn’t (initially) have 3 paid flights to book during the promo period. Then plans changed and I realized that with some creativity I could in fact book 3 paid trips, but two were just under the spend threshold. Luckily, I came to my senses and realized how to maximize my return on flights I needed by triggering my Mile Play offer. With some luck, I hope that my experience may be helpful if you ever find yourself in similar circumstances with a valuable offer that you don’t think you can meet. Maybe you can earn those bonus miles after all.
The offer details
As I said above, my offer was pretty simple: register first, then book and fly 3 trips of $250 or more by 10/31/19 to earn 23,000 bonus miles. The “catches” are that you first have to be targeted for an offer (and most people who are targeted don’t see offers quite this generous) and you also have to register before booking (previous bookings would not count) and in my case the trip fare for each trip had to be at least $250 — i.e. before taxes. In a win for consumers in terms of transparency, airlines and online travel agencies are required to display the full price of a flight with taxes and fees included. However, if you’re trying to spend $250 on the fare component without taxes included, that adds an extra wrinkle of complexity. Enter ITA Matrix.
ITA Matrix
ITA Matrix is a powerful free took for searching airfares that includes a lot of complexity that is probably best understood by old-school travel agents. I am far from being an ITA Matrix expert. However, I attended a great session about using ITA Matrix years ago that was led by Scott Mackenzie at Travel Codex and learned enough to be able to use it somewhat effectively. More importantly, I learned enough to cause me to stumble forward and figure out additional capabilities as I’ve grown a bit. Greg has also written about times when the ITA Matrix tool can be useful, especially in terms of hidden city ticketing.
At its most basic level, ITA Matrix works like a an airfare search engine. You input departing and destination airports and ITA searches the available fares given your parameters. In addition to searching specific dates, you can search for more flexible trips (such as a 6-night trip starting on any day in February 2020). However, ITA Matrix does not book trips. It’s simply a resource for finding fares and information and also for advanced-level filtering of that information.
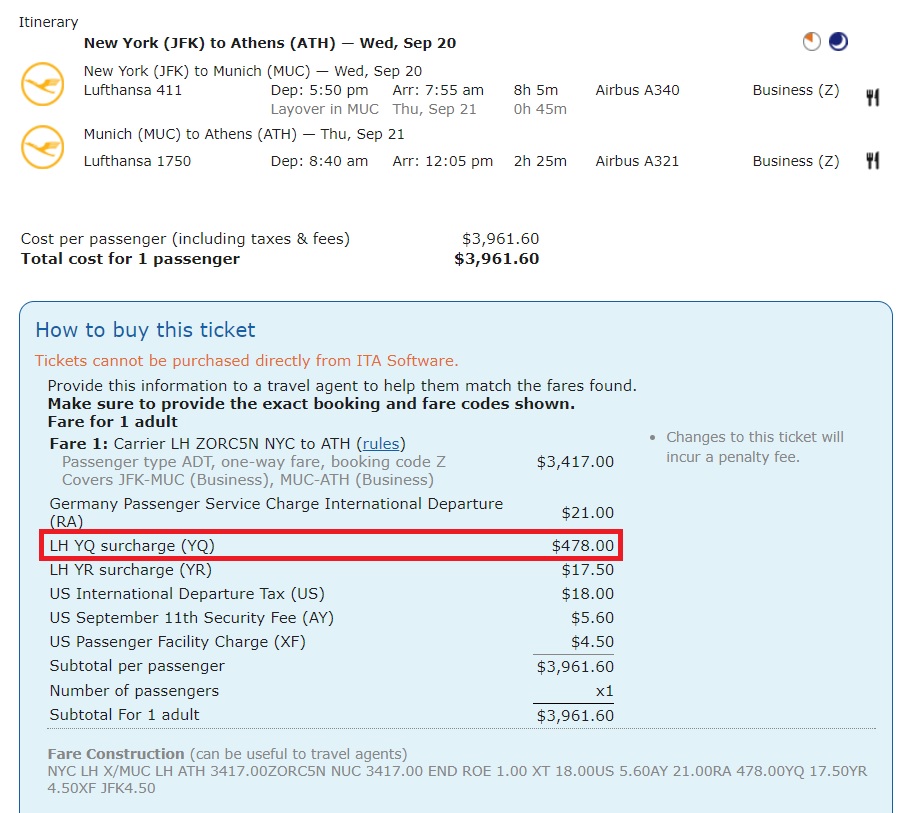
In fact, when you look at the details of a fare through ITA Matrix, you’ll find a complete breakdown showing the fare as well as any surcharges and government taxes broken down as line-items. That’s really handy when you’re trying to check the exact amount of the fare component of a price.
ITA advanced routing controls and price breakdowns
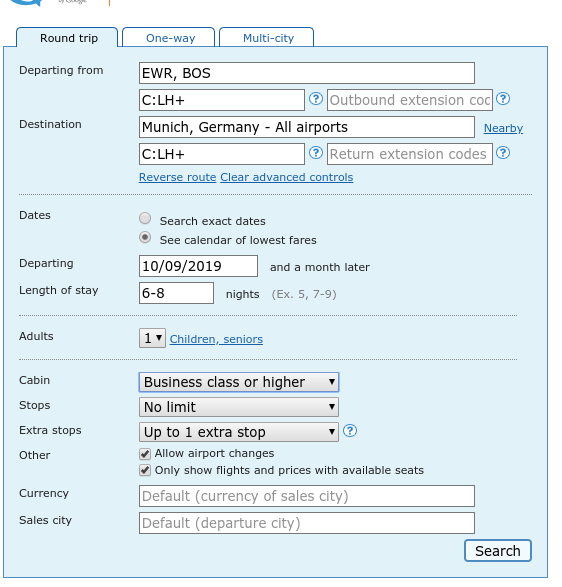
As noted above, ITA can be used to filter information quite precisely. If you click the “advanced routing controls” under the departing and destination cities, you can add some code to more precisely specify the results you want. For example, I could search for a round trip business class flight from either Newark or Boston to Munich on one or more Lufthansa segments for 6-8 nights starting on October 9th or later (see “C:LH+” under the airport codes — that means one or more flights on Lufthansa — in other words, I’d do this if I only wanted to see results on Lufthansa flights and I didn’t mind connecting).
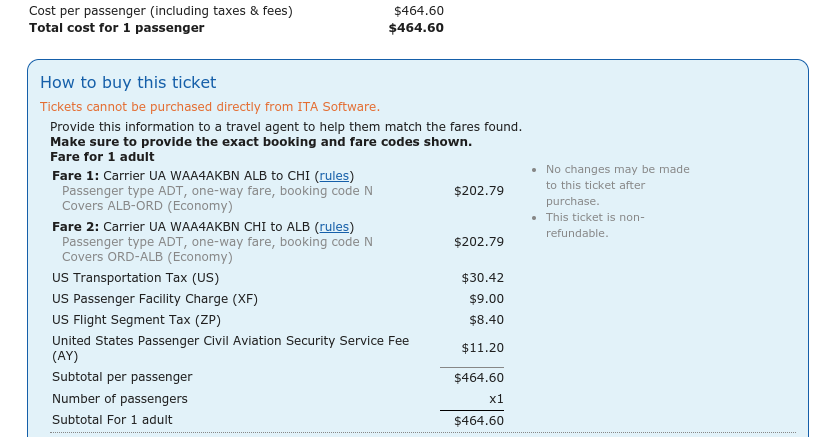
When I click through on the search results, it breaks down the fare in detail. Many readers may be familiar with using this to determine the approximate fuel surcharges on award tickets.
However, this can also obviously come in handy when you’re looking for the cost of the fare component as well. See “Fare 1” and “Fare 2” below for the fares in either direction on this example United itinerary:
A tale of two trips: one too expensive and one too cheap

My first problem, and the reason why I initially ignored my Mile Play offer, is that I rarely book paid airfares. I generally fly on award tickets and didn’t think I would meet the trip requirements.
However, I did end up needing two trips: one to Chicago later this month for the Chicago Seminars (where Greg and I will both speak about #40KFaraway as well as other topics) and one unexpected trip to Houston this past Sunday to Monday. I was booking the Houston trip last-minute and would ordinarily only have entertained the possibility of award tickets since cash tickets were north of $500 each way. However, I recently accepted a voluntary bump on a United flight and got a $1,000 voucher that is valid for a year. None of the award flight options had the timing I needed and I decided that, while an overnight trip to Houston wasn’t what I had in mind when I accepted the bump for a thousand dollar voucher, it would give me the ability to pick the timing I needed without having to dig into my pocket. I ended up settling on booking just one way on United, from Hoston back to upstate New York, for over $500.
That left me short of the goal though: with the #40KFaraway challenge kicking off tomorrow, I won’t have any time to sneak in an extra trip on United before the end of October, so I again nearly ignored this offer since I was only going to have 2 trips to book.
Then I came to my senses and realized that I could book the flight to Chicago and the return flight as separate “trips”. There was nothing in the Mile Play requirements specifying that travel had to be round trip. Great! I’d book each way separately and have my 3 paid trips to qualify.
The problem? The one-way trips from my home airport to Chicago and back weren’t expensive enough. Google Flights was showing me $213 each way — just a wee bit short of the required $250 per trip.
Enter: fare class codes.
Filtering by fare class at ITA
Not being a regular paid-ticket purchaser, I’m not well-versed in the nuances of fare buckets, but I know enough to know that there are many different classes of “economy” tickets. While we’re probably all most familiar with the distinction between “basic economy” and “economy”, there are also many other lettered distinctions — N-fares and Q-fares, Z-fares and B-fares. My understanding is that airlines create these different fare “buckets” and know how many people will be willing to pay one price or another. Airlines then change the price accordingly with supply and demand by making these various fare buckets available or unavailable.
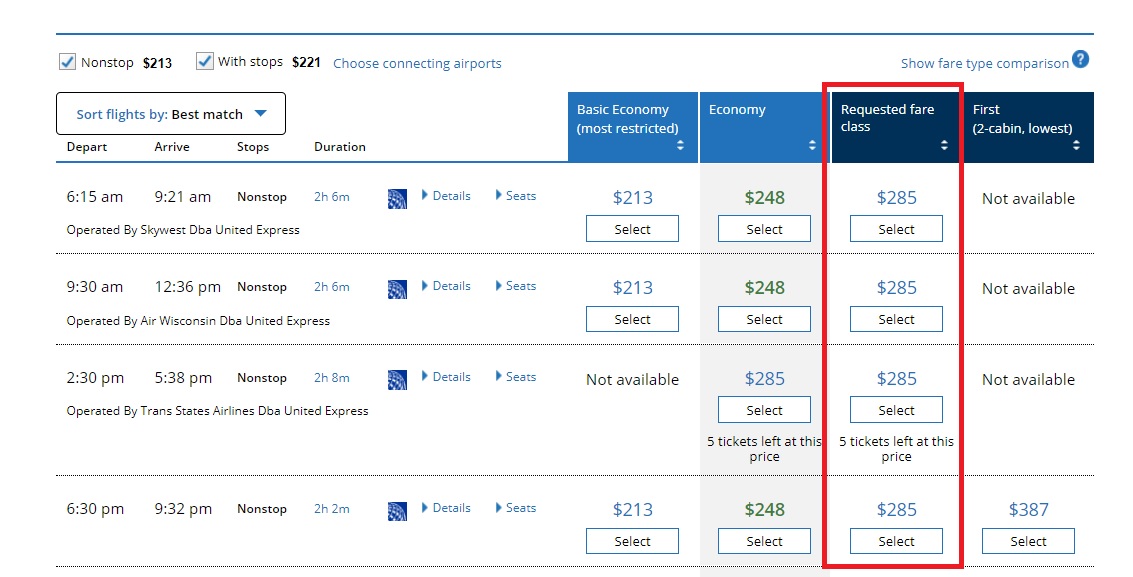
Going to ITA Matrix and then to United.com, I could see that the $213 fare I was seeing was an N fare. I knew that there were probably more expensive economy class fares. In fact, United.com showed me a few different economy class fare buckets in search results: there was a basic economy class ticket at $213 each way or a “regular” economy class ticket at $248 each way (still too cheap). I could alternatively book a fully-flexible economy class ticket for $393 or a first class ticket for $387, but those were overkill. I needed a happy medium.
However, I knew that those probably weren’t the only options.
Unfortunately, I don’t know all of the United fare classes. However, I knew that the website wheretocredit.com, a website that shows you frequent flyer mileage earnings in various programs based on fare classes, lists all of the various fare classes for each airline. Rather than picking a specific fare class out of the drop down, I left the selection on “any” to see all of the various United airlines fare classes.
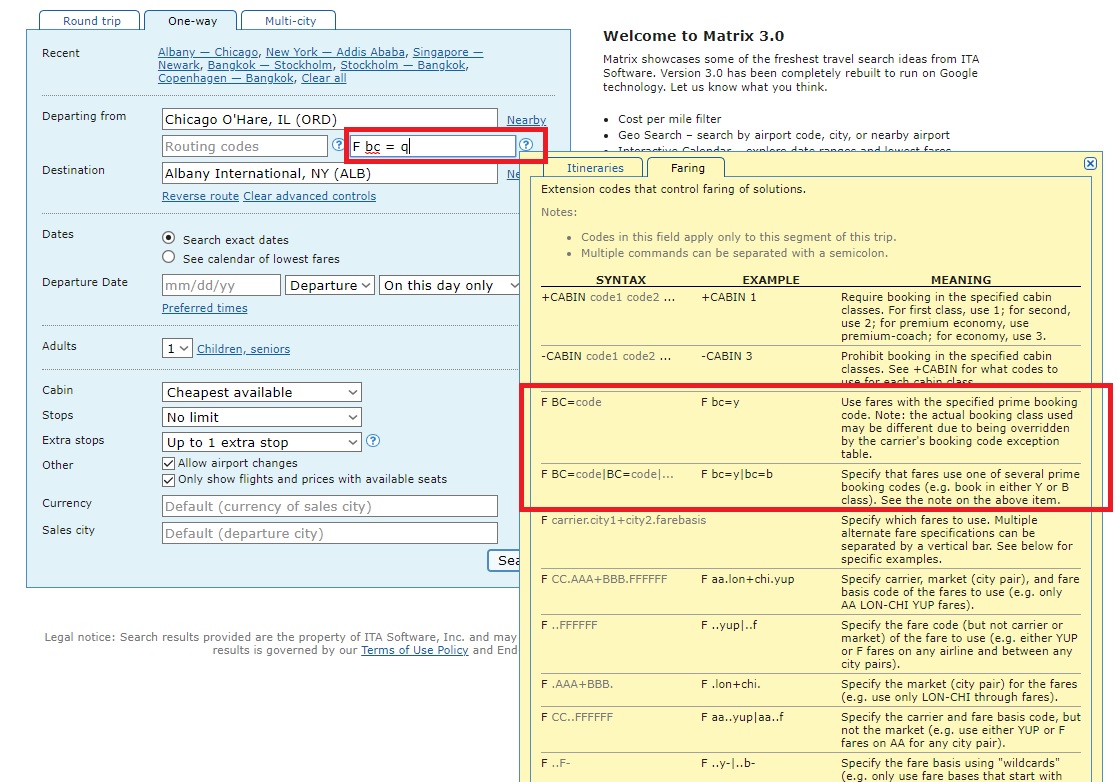
I then went back to ITA Matrix. I know that letters near the end of the alphabet are often associated with cheaper economy class tickets and those near the beginning are often associated with premium cabins, so I started near the end of the alphabet to test pricing. I had recently discovered that by clicking the “advanced routing controls” button underneath the city pairs on ITA Matrix, I could specify the fare class I wanted to see. Keep this tip in mind: it will be make a reappearance next week in a post about making my way home from the #40KFaraway challenge.
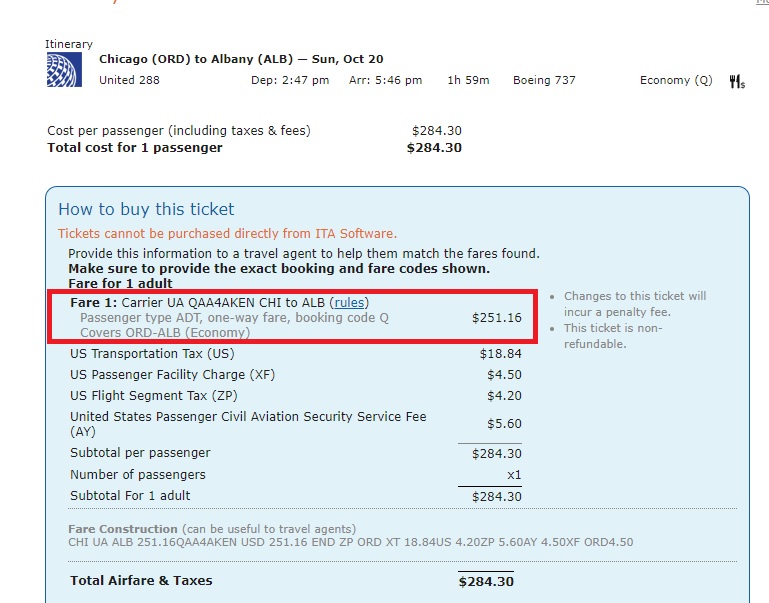
Eventually, I found a winner: the Q-fare for my flights was $251.16 — almost perfect. With taxes, that came to $285 each way. I now knew what I wanted: a ticket in the Q fare bucket.
The only problem is that United didn’t show me that fare when I searched for my city pair at United.com.
Enter: United advanced search options.
United advanced search options
Again, those who regularly book paid tickets for business are probably already very familiar with United’s advance search options. As someone who primarily books award tickets, I haven’t used the tool much since it stopped being useful for forcing together crazy multi-city award itineraries.
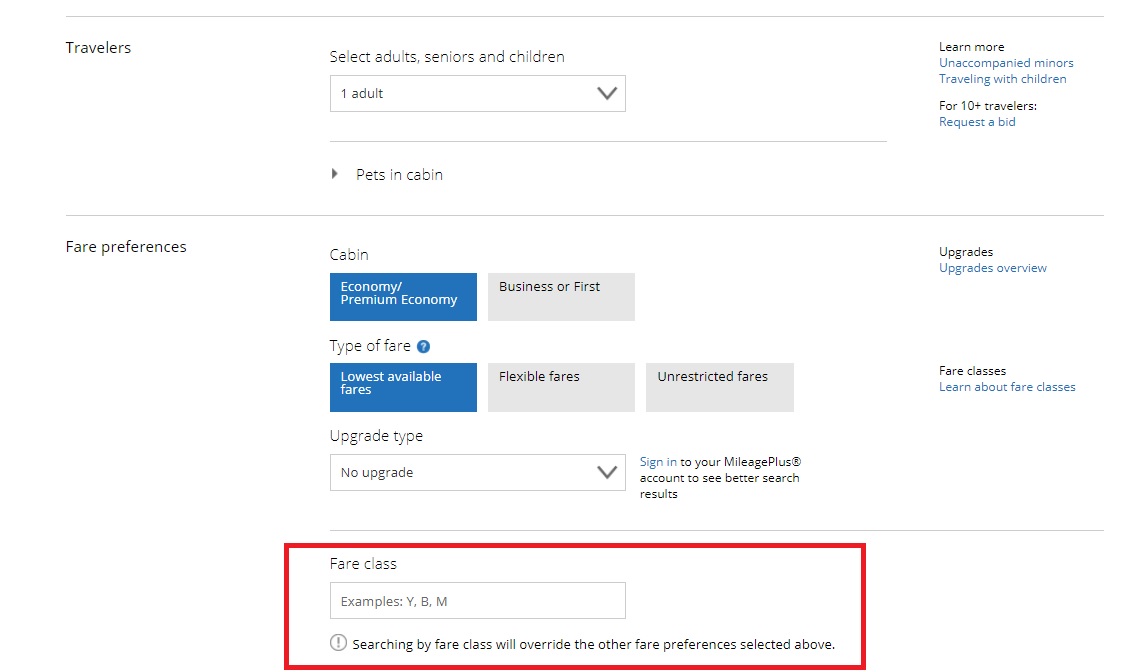
However, it turns out that the tool is also useful for meeting your Mile Play requirements: one of the advanced options allows you to specify a fare class.
Sure enough, when I entered “Q” in that box, United replaced the fully-flexible economy class fare in the 4th column with my “requested fare class”.
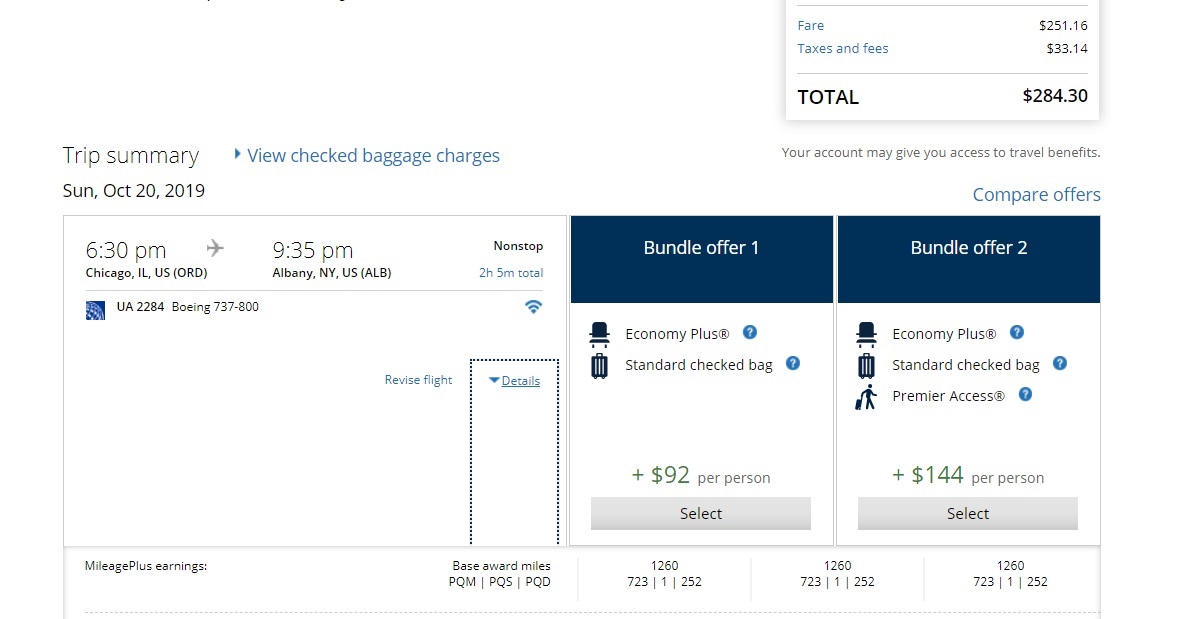
In this case, that was Q-class and upon selecting it was I able to verify on the next page that the fare was indeed $251.16, sneaking me into qualification for my Mile Play offer.
This did of course mean overpaying for my flight. In this case, the round trip flight to Chicago came to $568.60. If I were willing to fly basic economy (which was questionable), it would have cost me $426 round trip. More likely, I would have booked the regular economy ticket for $248 each way for a total of $496. Still, I overpaid by $72. I think the chance to earn a bonus 23,000 miles was worth it.
Adding it all up
My flight from Houston to Albany rang in at $556. I then paid the $284.30 each way for the trip to Chicago. That’s a total of $1,124.60. I successfully used my $1,000 bump voucher over the three transactions and was on the hook for the balance of $124.60.
When I accepted the thousand dollar bump voucher a few weeks ago, I was excited about the prospect of a potentially free family trip to Europe sometime next year since tickets sometimes dip below $300 per person round trip from New York. However, when I thought about it, using the voucher to book these flights and trigger the bonus miles just made sense. I knew I was going to book the cash ticket to Chicago. The cash ticket from Houston made sense in a tight situation where I needed to fly during a specific window of time. And in the end, I thought about it this way: cashing in my thousand dollar bump voucher right now gave me the opportunity to lock in a nice chunk of value in a form that won’t won’t expire in a year in the 23,000 miles plus the ~3,600 miles I’ll earn from the flights themselves. The fact that I’d also get two trips I would have booked one way or another made this seem like a no-brainer after I’d spent the brainpower thinking about it. Though I’m embarrassed to admit that my brain didn’t immediately see that I should book the Chicago trip as two separate one-ways, I am glad that it did function well enough to explore fare classes and ITA Matrix to figure out how to book the Q-fare and earn a nice little bucket of miles for my trouble.






[…] must be a minimum of $250 prior to taxes. Last time around, I wrote about how I managed to snag a fare that was $251 before taxes by forcing United to show me a specific fare class. If you are looking at trips where your fare is just a little too low to trigger the offer, […]
[…] ITA Matrix allows you to specify fare classes when searching fares (something I wrote about recently). I was therefore able to check and see that the “J” fare on this route was about […]
Hey, Nick. I once found myself in a similar situation and found a better way to find the right fare. You can say f ~bc=n and ITA will give you the next cheapest fare. You can keep adding fare codes to exclude until you find the one you want.
Good post, Nick. I did something similar with a $2,300 United voucher I got – bought paid F SFO-ORD with the voucher to keep status for a year which I would never have done otherwise but made sense with the funny money. Always have to be flexible with the hand you are dealt in this game to maximize your gain.
Thanks for this informative post. Question: how were you sure that a voucher would count as “spend” ?
Thank you for the timely reminder! I have two trips coming up that I booked after I registered (which was early September and I’d forgotten about the contest) and my offer was take two trips, $500 each at least, and get 18,000 extra miles. One trip was easily eligible, the other was just shy of the $500 so I upgraded for $100 and the rules state the FINAL FARE including upgrades purchased count toward the price (though taxes do not). So thank you! For a little bit of money, and a nice first class seat for 3.5 hours, I will be 18,000 miles closer to a free trip to somewhere nice!
Brilliant. Thanks for this. It’s because of stuff like this that I read this blog.
Your picture of frustration gave me a good laugh lol
Great article, always so helpful to see your thought process!
Helpful
What is a nice discussion! Thank you for sharing this valuable article.